Binding User Interfaces and Application State with Vanilla JavaScript
JournalWhat is application state, and why can architecting a centralised state for your product help when programming interactions for your User Interfaces?
In this article I would like to explain and show an example of how creating a centralised application state can help you handle and manage your application's User Interface.
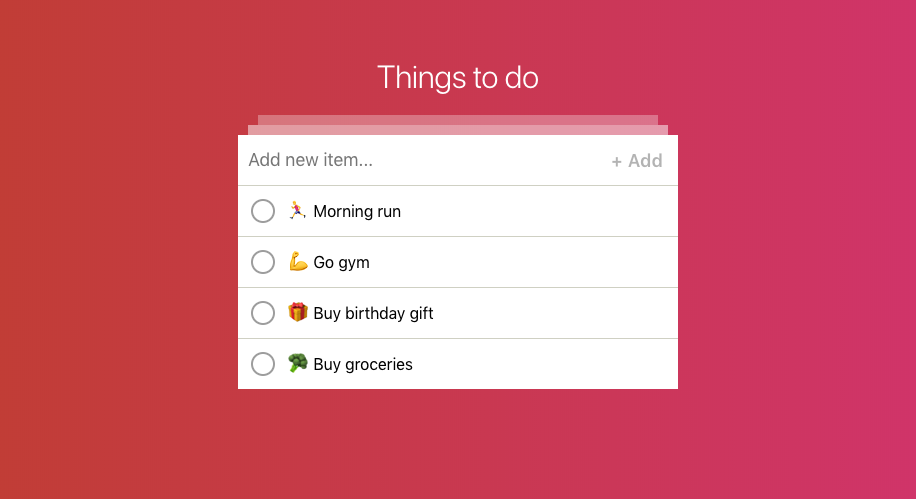
To explain application state, and some of the reasons why it is advantageous to use for application development — let's walk through a incredibly unique coding example of ... a To-do List app ⚡
Before we get to the code itself, let’s take a look at the definition of Application State:
“The state of a digital logic circuit or computer program is a technical term for all the stored information, at a given instant in time, to which the circuit or program has access. The output of a digital circuit or computer program at any time is completely determined by its current inputs and its state.”
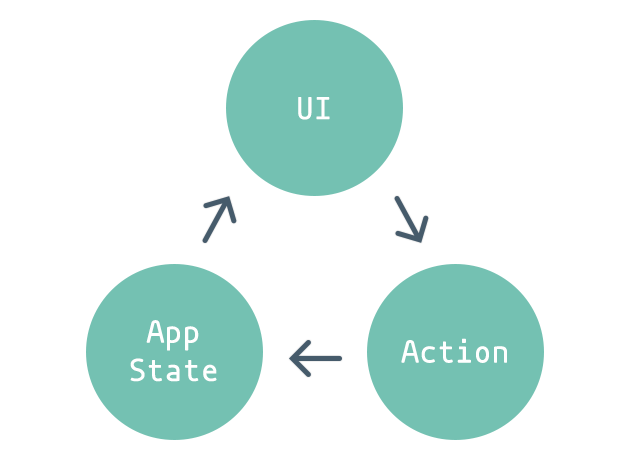
The flywheel above demonstrates a simple example of the life-cycle of an application using state to control it's user interface. The interface provided to the user allows them to provide input to, and change the application state, which in return updates the UI.
Application state can also be referred to as that of the finite-state machine — where it is used as part of a model for controlling the flow and execution of changes to an application.
Updating the UI
As users interact with the UI, actions take place, and as a response, the state of the application is updated. Think of when playing a video game, and when you press the A button, a sword is swung or a football kicked.
When these user interactions happen, the UI must also respond, and update — to present the user with appropriate content that matches their input. This is an infinite cycle continuing to occur for as long as the user interacts with the application — or, if the application has a live event stream, when other sources trigger updates to the application state.
Let's get started
To begin with; some simple HTML markup that will define the elements of our application. Secondly, we include the app.css stylesheet alongside some basic essential tags. But most importantly — two JavaScript files, state.js and app.js, that will handle our application logic:
<!DOCTYPE html>
<html>
  <head>
    <link href="favicon.ico" rel="shortcut icon" type="image/x-icon" />
    <link href="favicon.png" rel="icon" type="image/png" />
    <link href="app.css" rel="stylesheet" type="text/css" />
    <meta
      name="viewport"
      content="width=device-width, initial-scale=1.0, maximum-scale=1.0, user-scalable=no"
    />
    <title>To-do list: Application state example</title>
  </head>
  <body>
    <h1>Things to do</h1>
    <h2></h2>
    <div id="app">
      <form>
        <input
          autocomplete="off"
          type="text"
          name="item"
          class="item"
          placeholder="Add new item..."
        />
        <button type="submit">+ Add</button>
      </form>
      <ul></ul>
    </div>
    <script src="state.js" type="text/javascript"></script>
    <script src="app.js" type="text/javascript"></script>
  </body>
</html>
All application logic for creating and managing To-List items is written using Vanilla JavaScript and will be split between app.js, handling our UI logic for user interactions (view & controller), and state.js, that takes care of storing the current state of our application (model).
state.js
Let's create a basic State class that will be form the structure of our application state:
;(function (window) {
  'use strict'

  class State {
    constructor() {
      this.itemId = 1
      this.form = {
        focus: false,
        valid: false
      }
      this.items = []
    }

    addItem(item) {
      this.items.unshift({
        id: this.itemId++,
        status: 0,
        value: item
      })
      this.saveItems()
    }
  }

  window.State = State
})(window)
Our state has three properties:
- A form object, with properties focus and valid
- Integer itemId
- An array of items
With the property defined, we can also create a simple method addItem(item) to add new items to our list. Once the basic implementation of State created, we expose it to the global window object — to make it available from app.js.
app.js
The App class will be the backbone for our To Do list, handling user interactions, updating state, and reflecting changes to the interface.
;(function (State) {
  'use strict'

  class App {
    constructor(name) {
      this.name = name
      this.state = new State(name)
      this.dom = {
        button: document.querySelector('button'),
        date: document.querySelector('h2'),
        list: document.querySelector('ul'),
        form: document.querySelector('form'),
        input: document.querySelector('input')
      }
    }
  }

  const app = new App('todo-list-state-example')
})(window.State)
First we define the class App, setting some basic properties such as it's name and the DOM elements we will be interacting with, alongside creating a state from our state.js class, and then finally we initialise the application by invoking a new instance.
With references to the DOM in place, we can begin to define a method to render our UI based on the contents of our state property items:
render() {
	let listHTML = '';
	for (const item of this.state.items) {
		const className = item.status ? 'done' : '';
		listHTML += '';
		listHTML += '';
		listHTML += item.value + 'x';
	}

	this.dom.date.innerHTML = this.state.date;
	this.dom.form.classList.toggle('focus', this.state.form.focus);
	this.dom.form.classList.toggle('valid', this.state.form.valid);
	this.dom.list.innerHTML = listHTML;
}
Here we loop through the items stored in state, and update the contents of our <ul> based on the data provided. Depending on the state of focus and valid, we apply classes to the form, and we also define the date heading with the value stored in state.
What's important to take away from this is that the render method has no concern over how the data is created, but only that of how to display the data through HTML markup. This separation of concerns is one that helps when writing easy to interpret and scalable application code.
Adding a new item
bindEvents() {
	this.dom.form.addEventListener('submit', this.submitForm.bind(this));
}

submitForm(event) {
	event.preventDefault();
	if (!this.dom.input.value.length) {
		return;
	}
	this.state.addItem(this.dom.input.value);
	this.dom.input.value = '';
	this.render();
}
To add a new item to our to-do list, we need to bind an event listener to the <form>'s submit event, where we can capture the user's input and add it to the application state.
After adding the new item, we need to call render() once again to trigger the updates of state to UI.
Saving & loading user state
For a user's list to stay persistent – so if they return to the application, their items will still display — the data needs to be stored on server, or optionally, on client-side.
State works just like that as in video games — so when you return, you can pick up where you left off from.
For this example, we will be storing the data using localStorage.
;(function (window) {
  'use strict'

  class Store {
    constructor(name) {
      let isSupported
      try {
        window.localStorage.setItem('test', 'test')
        window.localStorage.removeItem('test')
        isSupported = true
      } catch (e) {
        isSupported = false
      }
      this.name = name
      this.isSupported = isSupported
    }

    save(items) {
      const json = JSON.stringify(items)
      window.localStorage.setItem(this.name, json)
    }

    load() {
      const items = window.localStorage.getItem(this.name)
      return items && items.length ? JSON.parse(items) : []
    }
  }

  window.Store = Store
})(window)
Create a new JavaScript file, store.js, where we can define a new class, Store. The Store class will be used to save and load list items to localStorage when needed, and also provides a flag isSupported, to protect us from errors if writing to localStorage is not available.
With the localStorage wrapper now available, let's integrate it with our application State class.
;(function (window, Store) {
  'use strict'

  class State {
    constructor(name) {
      this.itemId = 1
      this.form = {
        focus: false,
        valid: false
      }

      this.items = []
      this.store = new Store(name)
      if (this.store.isSupported) {
        this.items = this.store.load()
      }
    }

    saveItems() {
      if (this.store.isSupported) {
        this.store.save(this.items)
      }
    }

    addItem(item) {
      this.items.unshift({
        id: this.itemId++,
        status: 0,
        value: item
      })
      this.saveItems()
    }
  }

  window.State = State
})(window, window.Store)
window.localStorage and local development files
localStorage will not persist across page visits if you are serving your HTML file to the browser with the file:// URL pattern. Instead, you must serve your file so the browser believes it is hosted on a real server.
To do this, in Terminal, navigate to the folder your code exists in, and run:
python -m SimpleHTTPServer 3500Now you can navigate to http://localhost:3500 in your browser to see your application with localStorage code running as expected 🙂
Incrementing itemId on initialisation
Our itemId property worked great for setting incremental id's to new to-do items as they were added before — but now that we will load items from localStorage, when they exist, we need to loop through and update the itemId to continue from the previous ID.
if (this.items.length) {
  for (const item of this.items) {
    if (item.id >= this.itemId) {
      this.itemId = item.id + 1
    }
  }
}
By adding the above code to our State constructor after loading from localStorage, we can prevent items with duplicate IDs.
Marking as complete and deleting items
Alongside being able to add items, the user can also mark items as completed, or remove them from the list. To handle these actions, first, let's extend the State model to:
findItemIndex(id) {
	return this.items.findIndex((item) => {
		return item.id === id;
	});
}

deleteItem(id) {
	const itemIndex = this.findItemIndex(id);
	this.items.splice(itemIndex, 1);
	this.saveItems();
}


toggleItemStatus(id) {
	const itemIndex = this.findItemIndex(id);
	this.items[itemIndex].status = this.items[itemIndex].status ? 0 : 1;
	this.orderItems();
	this.saveItems();
}
deleteItem and toggleItemStatus either remove the item from state, or switch the value of its status between 0 and 1. To find which item in the array we should modify, we use the helper method findItemIndex.
Now, like with the form event listener, we must bind again to the user input to make changes to the application state:
bindEvents() {
	this.dom.list.addEventListener('click', this.handleClick.bind(this));
	this.dom.form.addEventListener('submit', this.submitForm.bind(this));
}

handleClick(event) {
	const e = event;
	if (e && e.target) {
		const element = e.target.type;
		if (element == 'submit' || element == 'checkbox') {
			const id = parseInt(e.target.parentNode.getAttribute('data-id'));
			if (element == 'submit') {
				this.state.deleteItem(id);
			} else {
				this.state.toggleItemStatus(id);
			}
		}
	}
	this.render();
}
And with this code, our To-Do list application can be seen at a relatively MVP state for an initial application.
(There are a few other methods in the final application code that you will see running in the demo — handling of moving completed items to the end of the list, displaying the current date in the header, and some visual styling for form interactions. The code for this functionality can be found within the source code also.)
Source code
github.com/matswainson/todo-list-application-state-example
Source code is provided in ES6 format. Integration with Babel JS is needed to make the JavaScript cross-browser compatible.
Interactive demo
codepen.io/matswainson/pen/RMoGmj
I hope you found this article interesting and helpful at explaining some of the key fundamentals behind application state, and why it is so useful within product development to create a centralised state object that your User Interface relies on.
This concept is also helpful for communication between designer & developers; in which, for example, the pair can use it to define a set of finite states that the product feature will have — giving clarity and understanding to to what the require outcome is for development & users interactions.
When it comes to developing a scalable, real world application / state machine, it is important to note there are many popular JavaScript libraries available which use the concept of state to help define & build their frameworks, such as:
Redux
The Redux JavaScript library provides a predictable state container for JavaScript apps. Redux takes the concept of application state much further than that of this article — but applies the same key concept that the state of your whole application is stored in a single object tree.
How Redux applies this concept further is that the state object itself is read-only, and can only be updated by firing an update state event — known as an action. As the state cannot be directly modified without firing an action, Redux can store a history of states, and also explicitly details the reasons for each of these state changes with custom names for each action fired.
React Js
A popular JavaScript library built by developers at Facebook, React JS is engineered with the state logic programming methodology in mind and also focuses around the use of a render method for controlling how the UI displays.
Morphdom
github.com/patrick-steele-idem/morphdom
Morphdom is a JavaScript library that helps optimise the performance of updating the DOM based on application state changes. In our To-do list example, each time the render method was invoked, the entire title, form and list DOM nodes were being updated each time — even when the state for those elements had not changed since the previous call.
This can be a bottleneck for performance of your application as you add more logic, views & functionality, and above all is unnecessary. Morphdom is a module which provides the functionality to filter our unnecessary DOM calls and as such optimise the performance for the render loop.
Further reading
If you are interested in reading more on the topic of application state, the following articles can also be nice to read:
- Game Programming Patterns > Design Patterns Revisited: State http://gameprogrammingpatterns.com/state.html
- MDN Web Docs: Anatomy of a video game https://developer.mozilla.org/en-US/docs/Games/Anatomy
- Finite-State Machines: Theory and Implementation https://gamedevelopment.tutsplus.com/tutorials/finite-state-machines-theory-and-implementation–gamedev-11867
- State-Driven Game Agent Design http://www.ai-junkie.com/architecture/state_driven/tut_state1.html